Exposure in photography is measured by stops. A positive exposure highlights the image and a negative exposure dims it. Although "correct" exposure is subjective, it is a good starting point. If you want to achieve a certain result, it is the most important thing to consider. Read on to learn about the different exposure values. The proper exposure must be determined by many factors. These are some of the most commonly used.
Shutter speed
It is crucial to get sharp pictures with a camera's shutter speed. You can use it to add motion to your subject. The shutter speed is determined based on how long the shutter remains open. A faster shutter speed usually means a shorter exposure. However, a slower shutter speeds can result in a longer exposure. It is possible to create dynamic images with a quick shutter speed in as little as a few seconds. To create a more atmospheric look, slow shutter speeds can be used to extend the exposure time.
Aperture
Manually adjusting the aperture of your camera is the best method to learn Aperture. This process is often a trial-and-error affair and works best with a manual camera. You can also use a priority mode to obtain certain shots if this is not something you feel comfortable with. You can manually adjust the aperture and the shutter speed with this mode.
ISO
There is a fine balance between the use of ISO and exposure in photography, and the right settings can make all the difference between a good picture and an average one. Your sensor will be less sensitive to light if your ISO is higher. The result is a brighter image but more noise and grains. You can shoot in darker environments with faster shutter speeds if you increase your ISO.
Intensity
Photography requires multiple light sources. These sources can include ambient sunlight or artificial lighting such as flashes, studio lighting, and even noonday sunlight. The intensity of light will impact the contrast and the differences between brighter and darker areas. Shadows will be created when the intensity of one subject's light is higher. This will increase contrast. Photographers will need to adjust their exposure settings to achieve the desired contrast when using multiple lighting sources.
Histogram
A histogram is an important tool for photography, especially in difficult lighting situations. It can help you determine if your subject was properly exposed. It can tell you if the image has clipped shadows or blown-out highlights. This will help you make sure that you are not taking poor photographs and save you time and money by not editing the wrong images.
Creative decisions
Photographers often make creative decisions when shooting exposure. The kind of subject you are shooting and where it is located in the frame will affect the exposure. In some cases the brightest subject matter could be in the strongest light, while others might be in shadows. It is important to determine which subject matter should be placed in the most light areas of the frame. Studio flashes can be used in conjunction with ND filters to increase the amount light reaching the lens.
FAQ
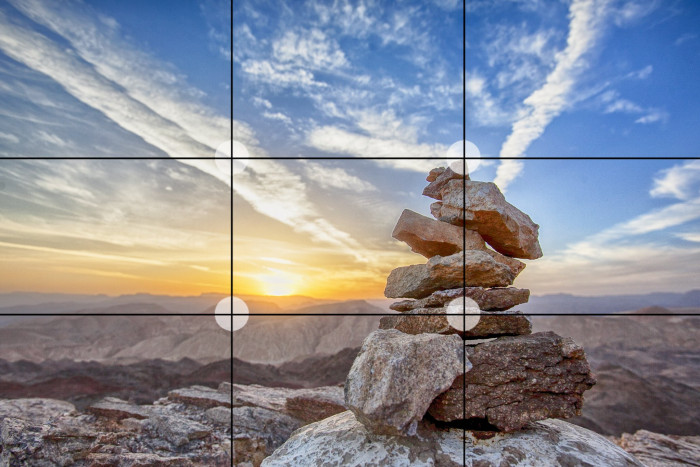
What is the rule to thirds in photography
The rule of thirds is an easy way to create interesting compositions without using complicated camera settings. It divides the image horizontally or vertically into nine equal pieces. This divides your image into three areas that you would like to see your subject. These are the top and middle thirds (in the upper left corner), as well as the bottom and lower right. These areas can be used to position your subject within your frame.
The rule of thirds also helps you avoid placing important elements too close together or too far apart. If you place them near each other, they may not have enough space between them to make a strong visual impact. They may lose focus if they're too far apart.
What equipment is necessary to begin digital photography
The first thing you should consider when starting out in digital photography is what type of camera you want to use. There are many choices, including DSLRs (digital one-lens reflex cameras), point and shoot compact cameras, camcorders, smartphones, and camcorders. Each one has its advantages and disadvantages. DSLR cameras, however, are larger and heavier than most other types of cameras. Point-and shoot cameras are lighter and smaller than other types of cameras and can often be set up automatically for certain situations. Camcorders provide excellent video recording capabilities and may also feature still photo shooting modes. Smartphones are light and portable and can be carried around easily.
Once you have made your decision on the camera type you wish to purchase, it is time to decide if you want to buy a used one or a brand new one. You can find affordable used cameras, particularly if you bought them in the last few years. New models generally cost more because manufacturers spend large amounts of money developing new technology.
Next, you'll need to buy lenses. Lenses are a critical part of determining the quality your photos. They let you adjust the focal length to zoom in and out of the scene, without losing focus. Some lenses are equipped with flash units built in, while others require external flash units. There are many brands offering a variety of lenses. Each brand has their own distinctive characteristics.
Finally, you need to purchase memory cards. Memory cards can store pictures that were taken with your digital camera. The size of your memory card will depend on the number of images it holds. It could store hundreds of thousands or even millions of pictures. Multiple memory cards are required if you intend to take many pictures.
What camera should I get?
All depends on the type of photographer that you want to be. For beginners, a simple point-and-shoot is the best camera.
Once you have mastered the basics you will likely need something more advanced. It really is up to you what you prefer.
These are some important things to think about before you purchase a new camera.
-
Features: What features do I need? Do you intend to use manual or autofocus settings? How many megapixels does your camera have? Is there an optical viewfinder?
-
Price: How much are you willing and able to spend on your camera? Are you planning to upgrade your camera every year or two?
-
Brand: Do you feel satisfied with the brand you choose? You don't have to settle for anything less than the best.
-
Functionality: Does your camera perform well in low light conditions? Are you capable of taking high-resolution photographs?
-
Image Quality: How clear are your images and how sharp are they?
-
Battery Life: How long does your camera last between charges.
-
Accessories: Are you able to attach additional lenses or flashes? ?
Do I Need A Tripod?
This is one of those common questions. The truth is that a tripod isn't always necessary, but it can come in handy.
A tripod allows you to stabilize your camera when taking photos at slow shutter speeds. A tripod is a great option for landscapes and other stationary subjects.
A tripod can also cause blurriness when you are photographing people or sports. How do you determine which situations need a tripod?
A tripod can be useful in any situation where you need to capture fast action or stationary subjects. Examples include:
-
Sports
-
People
-
Landscapes
-
Close-ups
-
Macro shots
This test will help you determine if you need a tripod. You can hold your camera still while you look through the lens. You will need a tripod if you see blurred lines and movement.
A tripod will not improve blurring if you don't notice it.
If you do decide on a tripod purchase, these are some things to remember.
-
Smooth legs are important for tripods. This will prevent unwanted vibrations from shaking your lens.
-
Use a sturdy tripod. Some tripods made of plastic may not last very long. Opt for a sturdy metal tripod.
-
Consider purchasing a remote release. This allows you to control your camera remotely. The button can be pressed to activate the shutter.
-
A tripod that can rotate 360 degrees is a good choice. This makes it easier to position your camera vertically or horizontally.
-
Keep in mind that tripods aren't cheap. Expect to pay $100-200. You will still get a lot out of your money.
-
Accessories such as filters and memory cards should be considered.
-
Before ordering online, you should check in your local shops. Many retailers offer free shipping.
-
You can read customer reviews to see what people think of a product.
-
Ask family members or friends to share similar products.
-
To learn more about customer experiences, you can visit forums and message board.
-
You can search online for reviews from other users.
-
Use websites like Amazon.com to compare prices and read customer feedback.
-
See photo galleries to see some of the creative uses for tripods by photographers.
Statistics
- While I cannot prove that all of those spots were not sensor dust, the photo was taken during a heavy snowstorm…so I guess that 99.8% of the spots are snowflakes. (bhphotovideo.com)
- Get 40% off Adobe Creative Cloud(opens in new tab) (creativebloq.com)
- By March 2014, about 3 million were purchased monthly, about 30 percent of the peak sales total. (en.wikipedia.org)
- The second easiest way to get blurry photos 100% of the time is to use a cheap filter on the front of your lens. (photographylife.com)
External Links
How To
How to take photos in low light conditions
Low-light photography is the art of taking photographs in dark or dimly lit environments. It requires special equipment. The main challenges are controlling exposure, white-balance, and sharpness. Two types of low-light photography exist: ambient or flash. Flash photography works best when there's enough light around. A flash is required if there isn’t enough light. Without a flash, it is possible to get a poor picture if the subject is indoors and not outdoors. Shooting at night in the moonlight hours is a good alternative to using a flash. This way, you'll get some nice colors and shadows. Another option is taking photos at twilight. Twilight occurs when the sun has set, but there is still daylight left.
Long exposures are also an option. Long exposures allow you to record images after the shutter has been open for several minutes. The shutter must be closed so that the camera only records light that hits the sensor. This light will continue to fall onto your sensor after a long exposure. But, the shutter remains closed and no new light enters. As a result, you see very little movement. To ensure you're getting a clear image, turn off any automatic settings like autofocus and auto exposure. Before you begin shooting, adjust your ISO setting. An ISO setting of 200 allows you to adjust how bright or dark the image looks. Once you are ready to click the shutter button, make sure it is fast. This will make the shutter close completely. You should then hold down the shutter button for as long as possible. To prevent additional light entering the camera, hold the shutter button down. Once you have taken your picture, wait for a few moments before you release that shutter button. This allows the camera time to process the photo. While the image is processing, you can see your photos on your computer monitor. Once you're satisfied with them, save them to your computer.